> For the complete documentation index, see [llms.txt](https://docs.clearfeed.ai/clearfeed-help-center/llms.txt). Markdown versions of documentation pages are available by appending `.md` to page URLs; this page is available as [Markdown](https://docs.clearfeed.ai/clearfeed-help-center/clearfeed-helpdesk/automations/automation-configuration.md).
# Automation Configuration
Learn how to configure the "When," "If," and "Wait" components of your automations.
## Choose Your Trigger
Pick what event starts your automation:
### Request Triggers
(*Available in All Product Editions*)
* **Request Creation** – New request submitted
* **Webhook call received** – Start an automation when an external system calls the ClearFeed provisioned webhook for an existing request or ticket. The automation must be enabled and mapped to the target's collection. Use a Personal Access Token with **Read & Write** access to call the API.
The following Request Triggers are available in Integrations & External HelpDesk Product Edition:
* **Request Update** – Status, priority, or field changes
* **Request Message Added** – New reply
* **Request CSAT Submitted** – Feedback received
* **Request Reaction Added** – Request reacted with an Emoji (you pick which one)
### Ticket Triggers
*Available in all Product Editions*
* **Ticket Creation** - New ClearFeed ticket created
* **Ticket Update** - Field changes
* **Ticket Message Added** - New message
* **Ticket CSAT Submitted** - Feedback received on ticket
* **Ticket Reaction Added** - Ticket reacted with an Emoji (you pick which one)
* **Webhook call received** – Start an automation when an external system calls the ClearFeed provisioned webhook for an existing request or ticket. The automation must be enabled and mapped to the target's collection. Use a Personal Access Token with **Read & Write** access to call the API.
* **Approval Workflow Completed** - Whenever an approval workflow is **completed**, whether the final outcome is *approved* or *rejected*.
* **Before Approval Workflow Triggered** – When selected, the automation runs **synchronously** before the approval workflow is initiated. Because the system waits for this automation to complete, delay steps are **not supported**, and the approval workflow executes only after the automation finishes.
Triggers in Automations for Internal Helpdesk
## Add Conditions
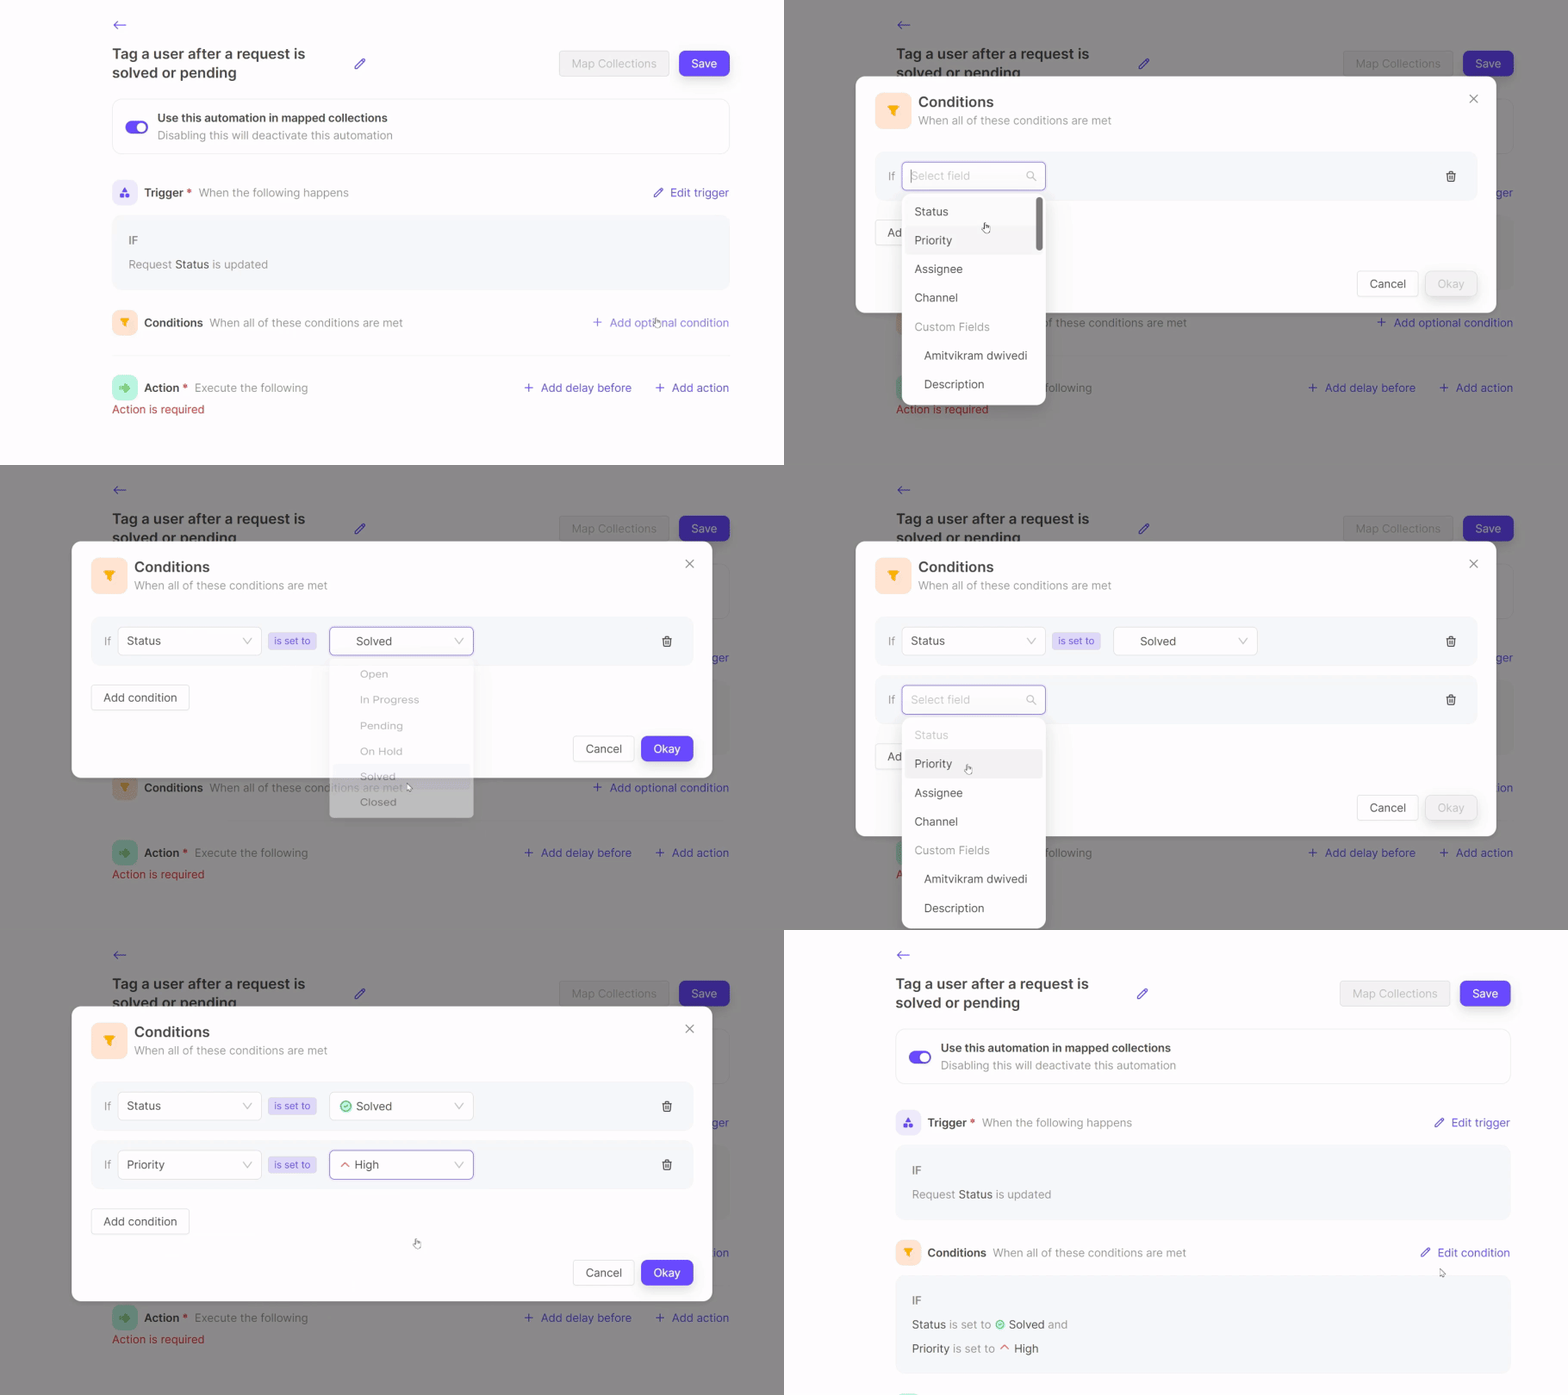
Conditions help narrow when your automation should run.
{% hint style="success" %}
Conditions are optional but allow precise targeting — all conditions must be true for the automation to execute.
{% endhint %}
### Standard Fields
Conditions are available on: Status, Priority, Assignee, Channel, Assigned Team, First Message Author, Customer, Source
The **Status** condition includes both regular and custom status values in the same value picker. Each custom status appears under **Status**, grouped with its parent status. You can combine regular and custom status values in a single condition.
Operators available:
* `is set to` / `is not set to`
* `is one of` / `is not one of`
### Approval Workflow Fields
* **Approval Workflow:** The name of the approval workflow. Use this field in automations to trigger actions for a specific approval workflow.
* **Approval Workflow Status:** The final status of the approval workflow. Use this field to define conditions based on workflow state (approved or rejected).
### Business Hours
Time-based conditions that respect your workspace timezone:
* `Trigger time is inside business hours`
* `Trigger time is outside business hours`
### Custom Fields
Different field types support different operators:
| Field Type | Supported Operators |
| ----------------- | --------------------------------------------------------------- |
| **Text** | `is set to`, `is not set to` |
| **Number** | `is set to`, `is not set to`, `is greater than`, `is less than` |
| **Date** | `is set to`, `is not set to`, `is after`, `is before` |
| **Single Select** | `is set to`, `is not set to`, `is one of`, `is not one of` |
| **Multi Select** | `contains any of`, `contains all of`, `contains none of` |
| **User Select** | `is set to`, `is not set to`, `is one of`, `is not one of` |
## Set Delay
A delay postpones the actions that follow it. You can use a fixed delay or schedule the actions relative to a Date or Date-time custom field.
### Set a Fixed Delay
A fixed delay starts when the automation triggers.
* **Default:** No delay
* **Maximum:** 29 days, 23 hours, 59 minutes
* **Format:** Days / Hours / Minutes
### Set a Delay Relative to a Date Field
A relative delay runs the actions before the value in a Date or Date-time custom field. For example, you can send a reminder one day before a ticket's `Due by` value.
To configure a relative delay:
1. Use one of these triggers:
* **Ticket Creation**
* **Request Update** or **Ticket Update** on the same field used by the delay
2. Add a delay step and select **Relative delay**.
3. Select the **Date/Date-time field**.
4. Enter how long before the field value the automation should run.
5. Add the actions to run after the delay.
For **Request Update** and **Ticket Update** automations, changing the selected field cancels the existing schedule and reschedules the actions from the new value. For a **Ticket Creation** automation, changing the selected field cancels the existing schedule but doesn't create a replacement, because the creation trigger doesn't run again.
Relative delays have these limits:
* The maximum offset is 30 days.
* Date fields support offsets in whole days. Date-time fields support days, hours, and minutes.
* You can schedule actions only before the field value. Scheduling after the value isn't supported.
* Relative delays support only these trigger configurations: **Ticket Creation**, or **Request Update**/**Ticket Update** when the trigger watches the same Date or Date-time field selected for the delay.
* To return to an automation without a delay, click **Remove delay**. You can't set the offset to zero.
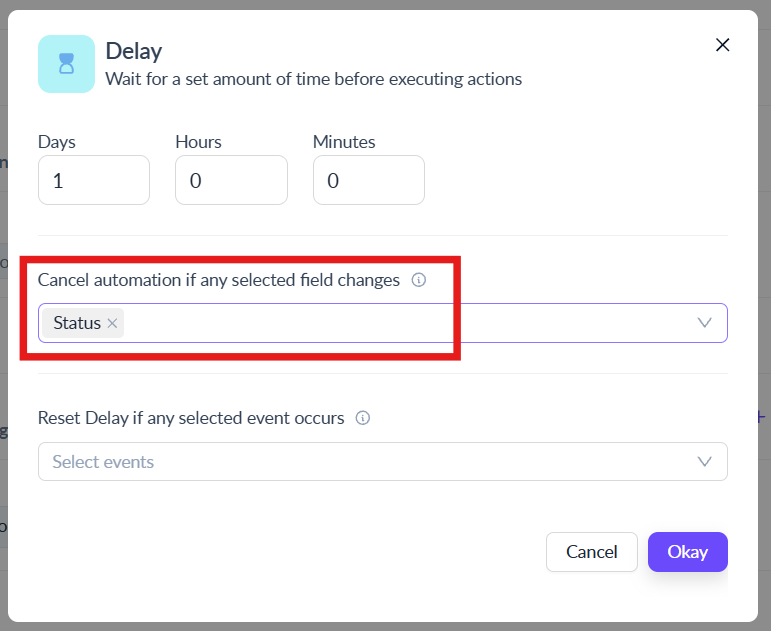
### Cancel a Fixed Delay on Field Changes
By default, once a fixed delay starts it counts down no matter what happens to the request or ticket. **Cancellation** lets you watch specific fields during the delay and automatically cancel the automation if one of them changes — so you don't run an action that no longer makes sense.
You can watch **one or more fields**, including **standard fields** (like Status or Priority) and **Custom Fields**.
Configure cancellation on field changes in the delay step
How cancellation behaves depends on whether the watched field is also used in the automation's **Conditions**:
* **Field is part of your Conditions** – The automation cancels only if the change makes the condition **false** (the request no longer matches). If the new value still satisfies the condition, the delay continues. In other words, the automation stays alive as long as the request still matches, and cancels the moment it stops matching.
* **Field is NOT part of your Conditions** – Any change to the field cancels the automation, regardless of the new value.
#### Example
You're building an automation that sends a follow-up to the Assignee when a request stays **Open** for 3 days, with a 3-day delay.
* **Watching `Status` (part of your Conditions)** – If Status changes to "Resolved" during the 3 days, the condition (Status = Open) is no longer true, so the automation **cancels** — there's no point following up on a resolved request. If Status stays "Open", the follow-up sends after 3 days as planned.
* **Watching `Priority` (not part of your Conditions)** – Any Priority change — say Medium → High — **cancels** the automation, even if Status is still "Open", because you told ClearFeed that any change to Priority should cancel it.
### Reset a Fixed Delay on New Activity
Automations with a fixed delay can reset the timer when there's new activity on the request or ticket — so follow-ups only fire after the conversation has actually gone quiet.
{% hint style="info" %}
**Why this matters:** Without reset settings, a delay timer starts when the automation triggers and counts down regardless of new activity. This means your follow-up alert might fire even though a follow-up was provided recently. With reset enabled, the delay restarts whenever there's new activity, ensuring actions (like alerts) only happen after genuine silence.
{% endhint %}
#### What Can Reset the Delay
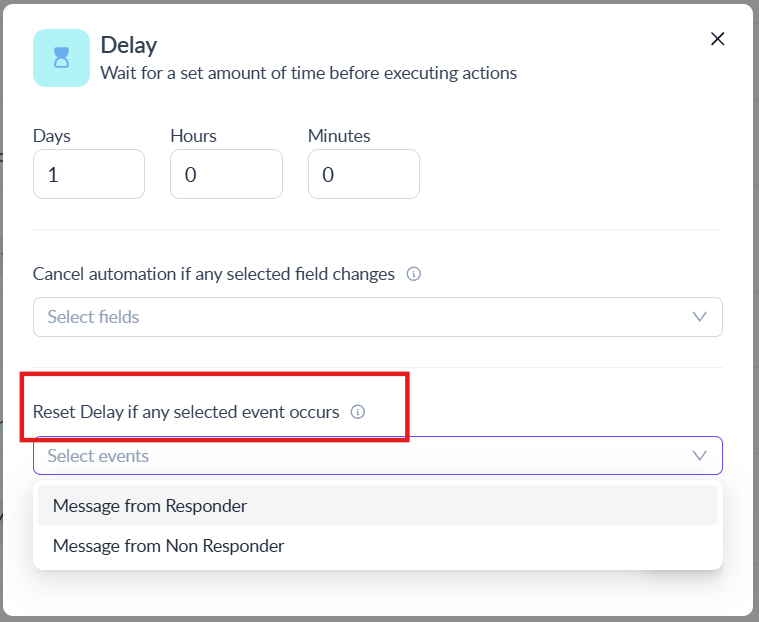
You can choose which types of messages reset the delay timer:
* **Message from a responder** – Restarts the delay when a member of your support team replies
* **Message from a non-responder** – Restarts the delay when the requester or customer replies
Configure reset settings in the delay step
#### How It Works
1. **Automation triggers** – The automation starts when its trigger event occurs and the conditions (if any) are met
2. **Delay begins** – The configured delay timer starts counting down
3. **New activity arrives** – If a message matching your reset criteria is posted, the delay timer **resets to zero** and starts counting down again
4. **Action executes** – The automation's action only runs after the full delay period completes without any resetting activity
**Note** Reset Delay does not re-evaluate the trigger condition. It simply extends the delay time on specific events.
#### Overlap Protection
You can't configure reset events that would conflict with your trigger — this prevents infinite loops where every message would both trigger new automations AND reset existing ones.
{% hint style="warning" %}
**Example:** If your trigger is "Message Added," you cannot add "Message from responder" or "Message from non-responder" as reset events. The system will block this configuration to prevent automations from piling up indefinitely.
{% endhint %}
## Recurring Automations
A **recurring automation** runs again and again for the same request or ticket, rechecking your condition on a timed cycle and taking action each time the condition is still met.
To make an automation recurring, enable the **Re-enqueue automation on completion** checkbox and configure **both** a [Condition](#add-conditions) and a [Delay](#set-delay):
* The **Re-enqueue automation on completion** checkbox is what makes the automation repeat. Without it, the automation runs only once, even when a condition and a delay are configured.
* The **Condition** tells ClearFeed when the automation should keep running. Re-enqueued automations check the Condition again.
* The **Delay** controls how long ClearFeed waits before each action.
{% hint style="warning" %}
**Note:** A condition and a delay on their own do **not** make an automation recurring. An automation only repeats when **Re-enqueue automation on completion** is enabled, so your existing one-time delayed automations are unaffected.
{% endhint %}
This is useful when you want ClearFeed to wait, recheck whether a request still needs attention, take action if it does, and then schedule itself to check again later.
{% hint style="info" %}
**When to use it:** Set up a recurring automation when you want a repeated, timed check on the same request or ticket — for example, a reminder that keeps nudging a thread until someone responds.
{% endhint %}
{% hint style="success" %}
**Practical Example:** For a complete end-to-end guide on creating periodic alerts for critical incidents, see [Providing Timely Updates During Incidents](/clearfeed-help-center/advanced-recipes/providing-timely-updates-during-incidents.md). This guide walks through setting up recurring automations with reset delays to post periodic reminder comments on incident tickets.
{% endhint %}
### How It Works
1. The automation starts when its **trigger** event happens.
2. ClearFeed checks the automation **condition** first.
3. If the condition matches, ClearFeed **waits** for the configured delay.
4. After the delay, ClearFeed performs the configured **action**.
5. Once that run completes, because **Re-enqueue automation on completion** is enabled, ClearFeed **re-enqueues the automation** for the same request or ticket.
6. The re-enqueued automation starts again from Step-2, checking the condition and repeating itself.
The automation is re-enqueued after a successful run. It is **also** re-enqueued if a run fails due to an action or system issue, so the automation can try again on the next cycle.
### Example: Recurring Open-Request Reminder
A team can set up a recurring alert for requests that are still **Open** and have not received a response:
* **When (Trigger):** Request Updated
* **If (Condition):** Status is "Open"
* **Wait (Delay):** 4 hours
* **Then (Action):** Post a reminder message in the thread
With **Re-enqueue automation on completion** enabled, ClearFeed waits for the configured time, posts a reminder, and then re-enqueues the same check. This keeps the thread active with repeated alerts until the request is answered, closed, or no longer matches the condition.
### How the Cycle Ends
The automation is **not re-enqueued when the condition is no longer met** — this is the normal way the recurring cycle ends.
The cycle can also stop if:
* The automation is **disabled**.
* The request or ticket **no longer exists**.
* An [Invariant](#invariance-settings) field change cancels the automation (as described in [Invariance Settings](#invariance-settings)).