ClearFeed WebApp
The ClearFeed WebApp is your central command center for managing support requests, tickets, and team workflows. Navigate to the Inbox from the left sidebar to view, filter, organize, and respond to requests across all your collections. Note that requests and tickets are used synonymously in this article.
The ClearFeed WebApp provides you:
A unified dashboard to view, filter, and triage requests.
A request details drawer to reply, add notes, and take actions.
Advanced controls like bulk actions, search, Kanban/List Views etc.

Navigating the Inbox
You can manage requests in two primary ways:
Collections: A Collection groups requests based on their source, such as Slack channels, DMs, or email. This is your go-to space for organizing and accessing requests by origin. You can also add new channels or collections. Learn more here.
Views: Views are saved combinations of filters that help you quickly access specific subsets of requests - ideal for managing different aspects of your support workflows. Learn more here.
What's Displayed by Default
When you navigate to Collections or Views in the web dashboard, the displayed content varies by product edition:
External Helpdesk: Shows both requests and tickets
Internal Helpdesk: Shows only tickets
You can use the Tickets filter to adjust this default behavior:
In External Helpdesk — Filter to see requests with tickets and without tickets. This can be used to see Email & Chat tickets (since Slack requests are often not tickets), or to view requests filed to external platforms like Zendesk as tickets.
In Internal Helpdesk — Filter to see requests that were not converted to tickets (for example, requests solved by the Virtual Agent). This makes it easy to identify which queries were auto-resolved and review the nature of AI responses.
Learn more about the differences between Requests and Tickets in How It Works.
Even if messages are deleted due to the configured Data Retention Period, the request/ticket will continue to appear in Collection & Views.
ClearFeed does not exclude requests from these views based on the data retention period.
Actions Available in Views and Collections
The following actions help you organize, manage, and take action on requests across both Collections and Views:
Filter Requests
Filters let you zero in on specific requests using parameters like status, assignee, SLA breach, and more.
Common filters include:
Status, Assignee, SLA Breach Status, Time Duration, Channel and Custom Fields
Created/Updated/Resolution Date: Filter requests by when they were created or last updated or resolved. Options include:
Last 7/30/90/180 days
Older than 7/30/90/180 days
All Time
Absolute - Custom date range
Last Messaged: Filter requests by the most recent message activity. Supports hour-level options (1, 2, 3, 24 hours) as well as day-level and absolute date ranges.
Requests with Tickets: Shows only requests that have associated tickets.
Tickets: Filter items by whether they are linked to a ticket or not linked to a ticket. Available for both Internal and External Helpdesk.
Involves: View requests involving team members (e.g., creators, repliers, or mentioned users).
Mentions: See Slack-originated requests where specific Slack users or Slack user groups (Slack Groups) are tagged in the conversation.
Author: Filter requests based on the request/ticket author.
Customer: Shows only requests for the selected Customer.
Contributors: Filter requests by secondary users assigned to assist with the request. Multiple users can be selected and the filter uses OR logic — selecting User A and User B shows all requests where either User A OR User B is a contributor.
For accounts with Customer Centric Inbox enabled, you can filter Requests using additional criteria, including Customer Owner, Source Type (Slack, MS Teams, Discord, Telegram, API, Portal, Email, Webchat) and any configured Customer Custom Fields. Learn more about Customer Centric Inbox here.
To apply filters:
Click Add Filter to open the filter dropdown.
Choose a field (e.g., Priority, Collection, Status) from the dropdown.
Select values you want to include/exclude and click Apply.
Combine multiple filters for precise results.
Remove filters by clicking the ❌ icon on any filter tag.
You can save filters as a Custom View. Default Views may include uneditable filters. Learn about Custom Views here.
Customize Display
Tailor how requests are displayed using layout options, grouping, column controls, sorting, and pagination—so you can work the way that suits your workflow best.
Layout Modes
You can switch between two display modes at the top of the Inbox:
List View: A table layout ideal for quickly scanning request details and performing bulk actions
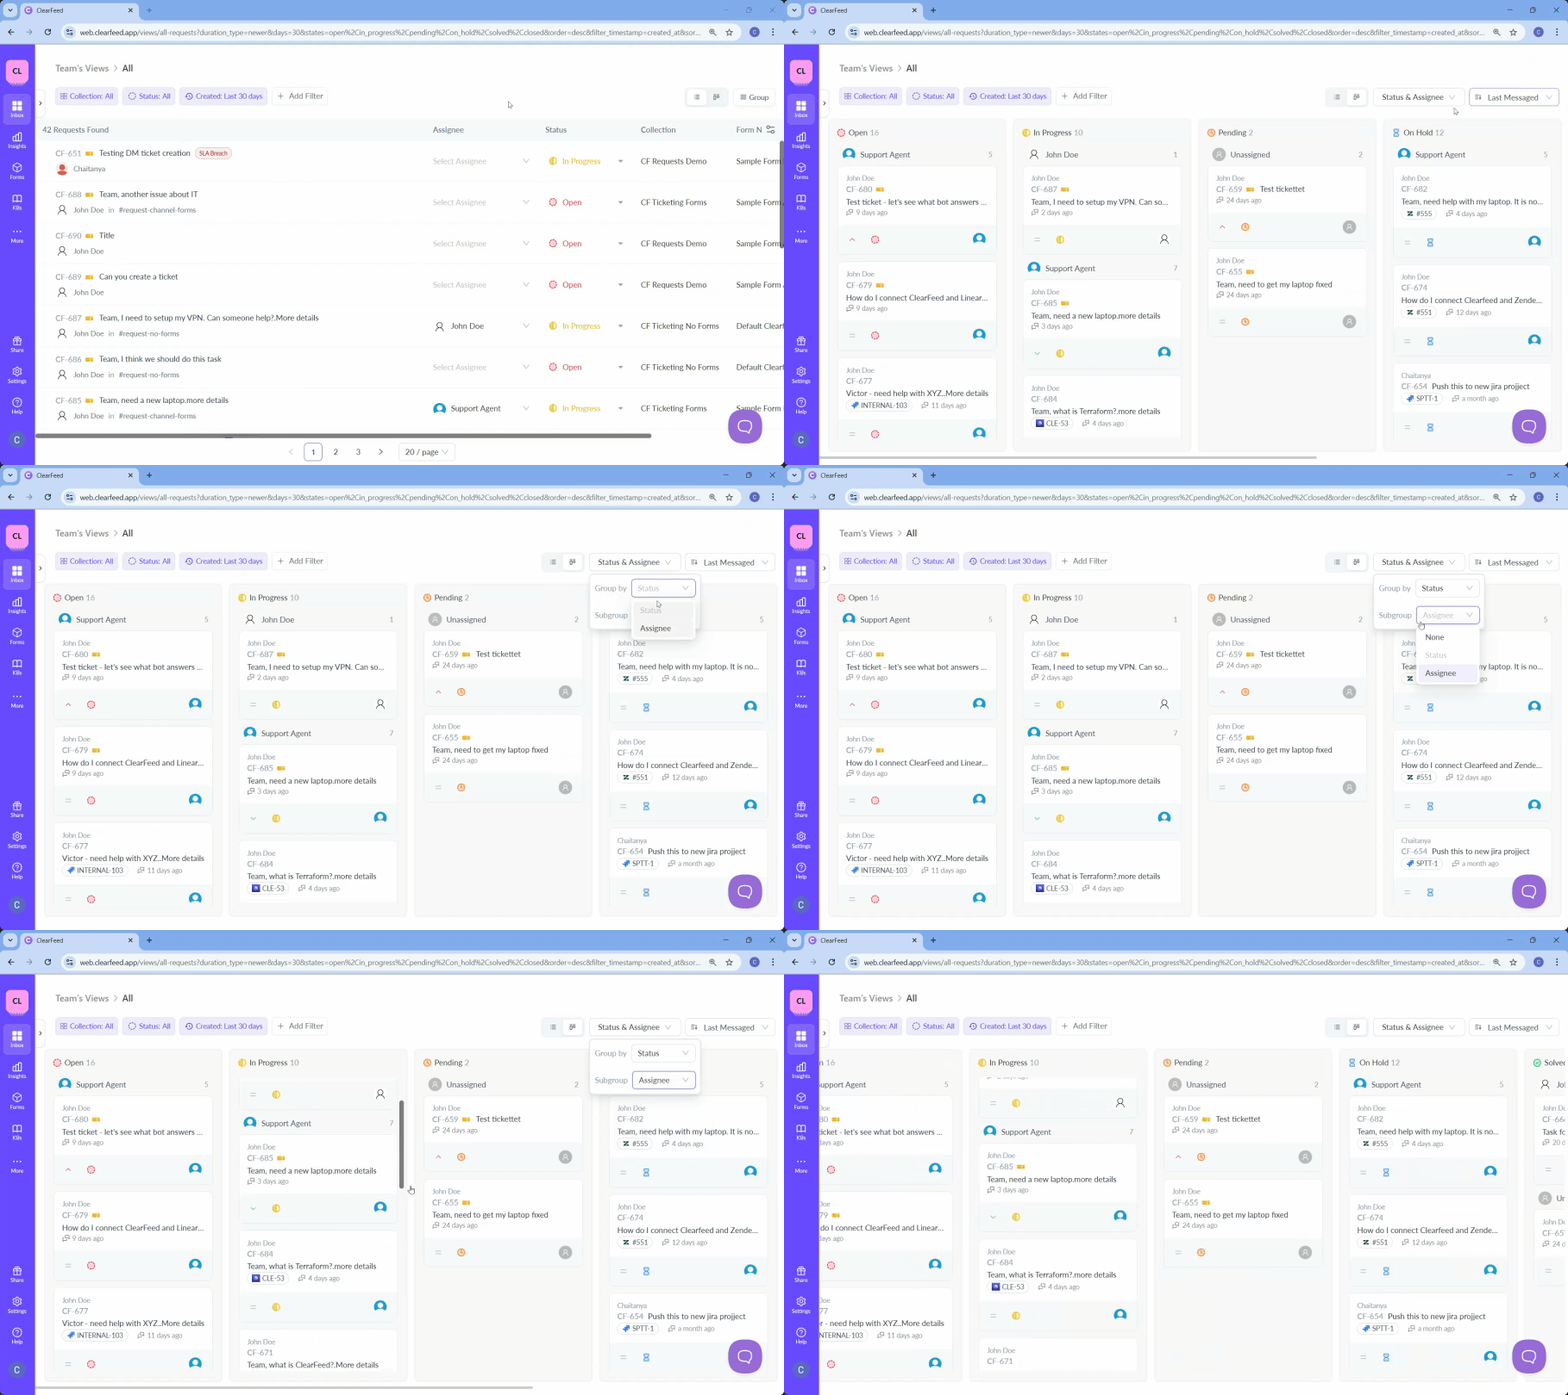
Kanban View: A visual board for managing requests via drag-and-drop interaction
List View
The List View is ideal for users who need a detailed, spreadsheet-like interface for managing large volumes of requests.
Key Features:
Display requests in a sortable, customizable table
Quickly scan key fields like Status, Assignee, Priority, SLA, and Dates
Apply filters, perform bulk edits, and group requests for better visibility
Customize which fields appear using the Configure Columns icon
Group requests using the Group button (by Assignee or Status)
You can now view the CSAT rating and comment directly in the List View. Use the 'Configure Columns' option to add them as visible columns.
Pagination in List View:
Navigate through pages using controls at the bottom of the table
Choose how many requests to show per page: 10 / 20 / 50 / 100
Bulk edits only apply to requests shown on the current page
Sorting in List View:
Sort by any column (e.g., Created Date, Updated Date, Resolution Date, or custom date fields)
Click a column header to sort; click again to toggle between ascending and descending
Sorting works independently of filters and pagination
💡 Pro Tip: Use List View when you need to filter, review, and update many requests quickly.
Kanban View
The Kanban View provides a visual, board-style interface for request triaging and tracking. In the Kanban view, each request tile displays the originating Slack channel name as a clickable link (opens the channel in Slack) and the customer domain name (if available).
Key Features:
Drag and drop requests across columns to update their Status or Assignee
Use inline icons on each card to quickly change Priority, Assignee, or Status
Group and sub-group requests using:
Group By: Status or Assignee
Sub-Group By: None, Status, or Assignee
Note: Assignees without requests/tickets are hidden from the Kanban view
Pagination in Kanban View:
Each column has independent pagination
More requests load automatically when you scroll to the bottom of a column
Sorting in Kanban View:
Requests in each column are sorted by Created Date (most recent first) by default
You can sort by other date fields like Updated Date, Resolution Time, or any custom date field
Toggle between ascending and descending order from the sort menu

💡 Pro Tip: Use Kanban View when you prefer a visual workflow for request handling.
Bulk Edit Requests
Bulk edit lets you modify multiple requests simultaneously, saving time on routine updates.
How to Bulk Edit:
Use the checkboxes on the left side of the list to select one or more requests.
Choose whether to Mark as Solved or Edit Properties like Assignee, Status, or Priority.
If marking as solved, click Confirm on the pop-up to apply the change.
If editing properties, select the field and value you want to apply to all selected requests, then click Submit.
Bulk edits apply only to the requests visible on the current page.
Request Search
Search by ID
Quickly locate a request using the ClearFeed Request ID (CF-ID).
Access the search bar on the dashboard.
Use
Ctrl + K(orCmd + Kon Mac) as a shortcut.CF-IDs can be found in Slack threads or within the web app.

Pro Tip: Hit Ctrl + K (Command + K on Mac OS) to quickly open the search bar
Keyword & Phrase search
The Keyword & Phrase Search feature helps you quickly find the right requests or conversation across your monitored Slack channels, email threads, and other connected sources — without endless scrolling.
With keyword search, request ID lookups, and user-based filters, you can locate past requests, review message history, and jump directly to the context you need.
What You Can Do
Find requests by keywords – Enter any keyword or phrase to search through request titles and conversation messages. Matching text appears highlighted in the results for quick scanning.
Jump to a request by its CF ID – If you know the request CF ID (e.g.,
CF-370), type it in to go straight to that request.Search by user – Type
@followed by a name or email to search results by messages from that person. Works for both internal team members and external users in your Slack workspace.View recent searches – Your last 5 searches are saved locally so you can quickly run them again.
How to Use Search
Open the search interface
Click Search in the top-left of the navigation, under the header Inbox.
A dedicated search panel will open, showing your recent searches.
Type your search query
Enter search keywords and
@usernameor a request CF-ID and hit<Enter>.Autocomplete suggestions will appear for matching users and request IDs.
Review search results
Results include titles, matching message snippets, and request IDs.
You’ll see up to 20 results per page (with more available via pagination).
Note:
Search results are limited to a maximum of 100 right now.
Sort order persists only within the current browser session and resets to Relevance when a new session starts. The duration filter, however, is always preserved across sessions. After a browser restart, users will see their duration filter retained but sort order reset to Relevance.
Open a request
Click any result to jump directly to that request.
For message matches, ClearFeed will scroll you to the exact message within the request.
Sort by relevance or recency
By default the search results are sorted by relevance.
Requests that match the search keywords more closely in terms of keyword and semantic match are ranked higher.
You can sort requests by time instead by using the
Sort Bydropdown next to the search bar.Note: In the search results panel, sorting is limited to relevance or recency. Direct sorting by other fields (such as 'Created') is not supported.
Narrowing search results using Time filter
Search results are limited to 100 and may not show all the requests matching the search keywords.
By default, no time filter is applied - and all requests available in ClearFeed are searched.
To see all matching results for some keywords, apply a time filter using
Requests Createddropdown next to the search bar.
Search Behavior by Product Edition
External and Integrations Product Edition: Search results include all requests, whether a ticket has been created or not.
Internal Product Edition: Search results include only tickets.
Tips for Best Results
Combine keywords with user tags to narrow down to messages from a specific person on a specific topic.
Use request CF IDs when you know exactly what you’re looking for.
Shorter, unique phrases often return the most relevant matches.
Use a time filter if more than 100 search results are being retrieved.
Download Requests
There are two ways to export request data:
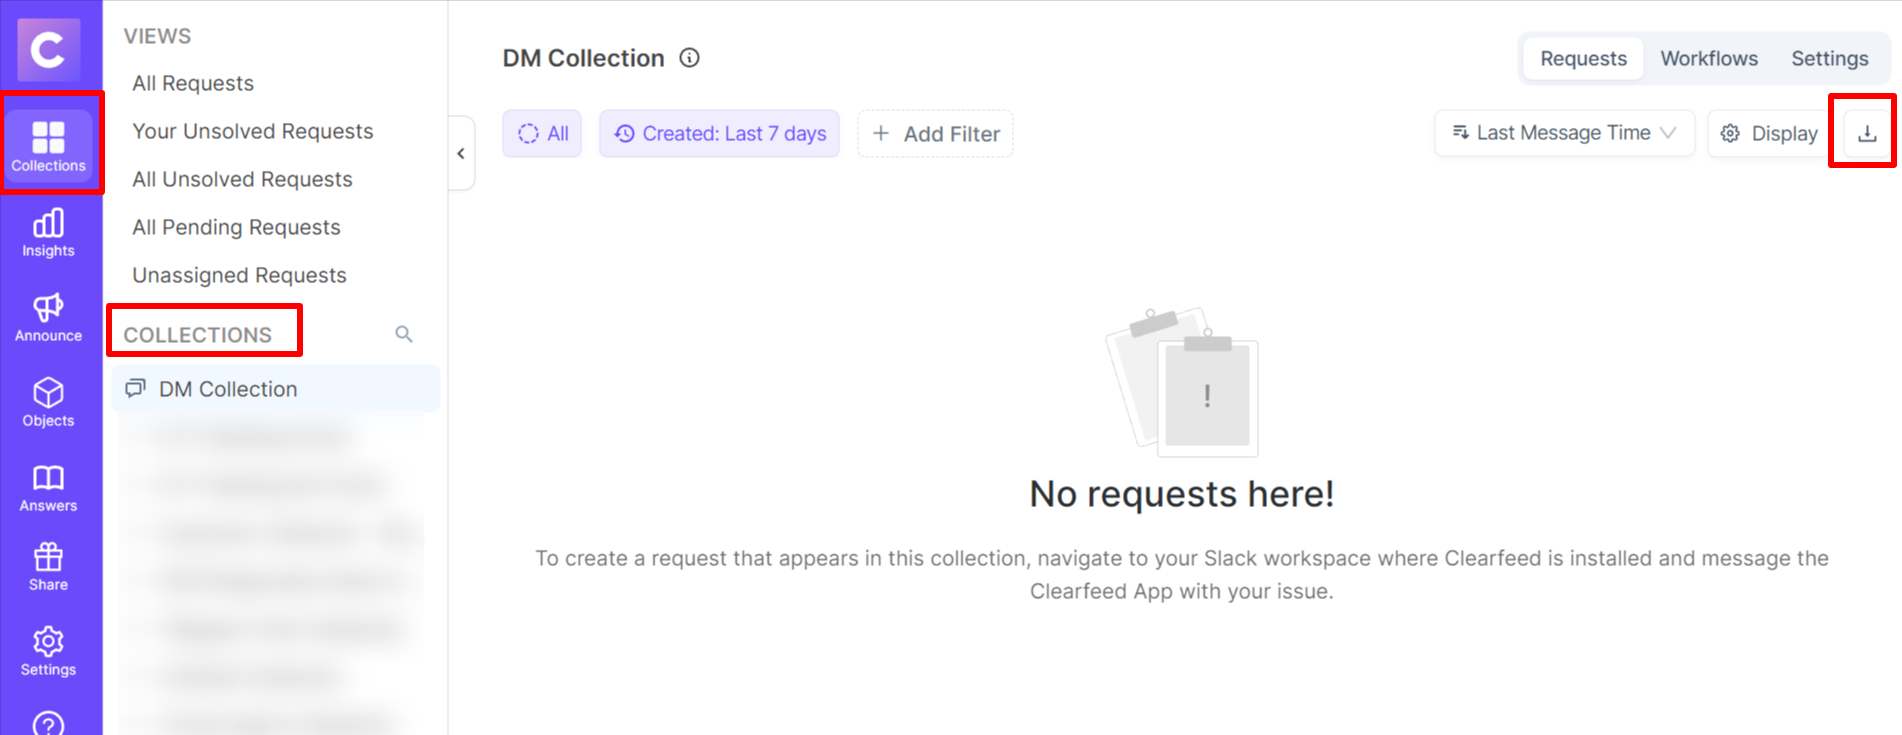
From the Dashboard (Views or Collections):
Click the Download button in the top-right corner.
Export includes only data based on active filters.

Example from the Collection Dashboard
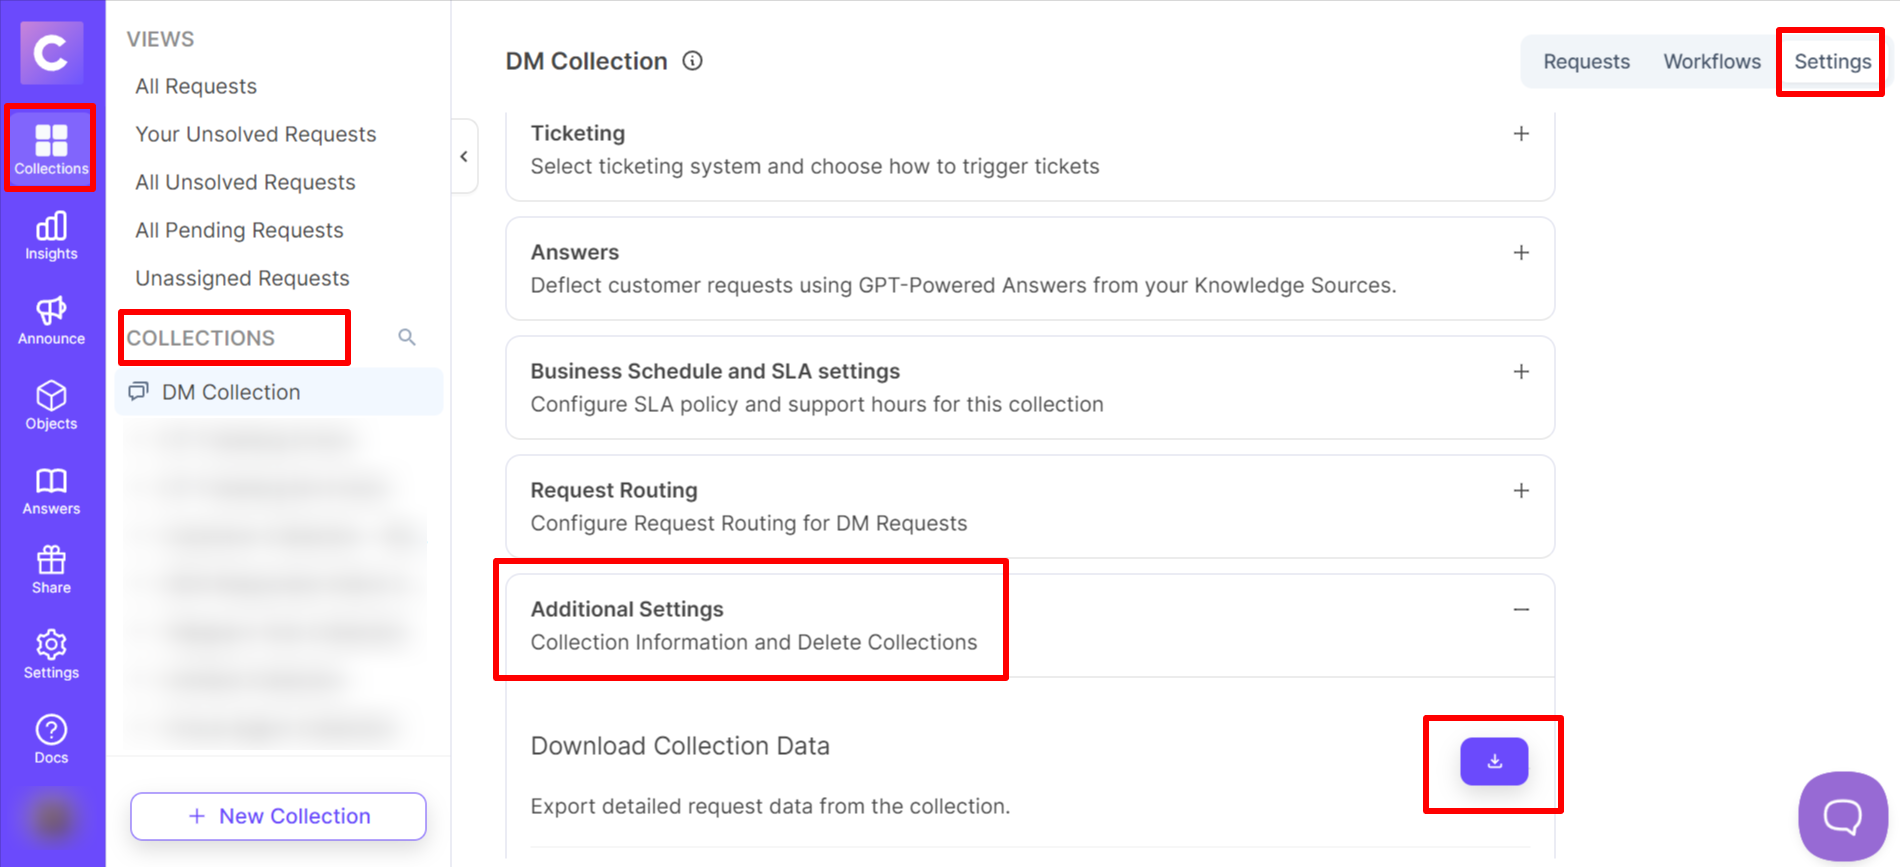
From Collection Settings:
Go to Additional Settings > Download.
Specify a date range before downloading.

Example from the Additional settings of collections
Request Details Drawer

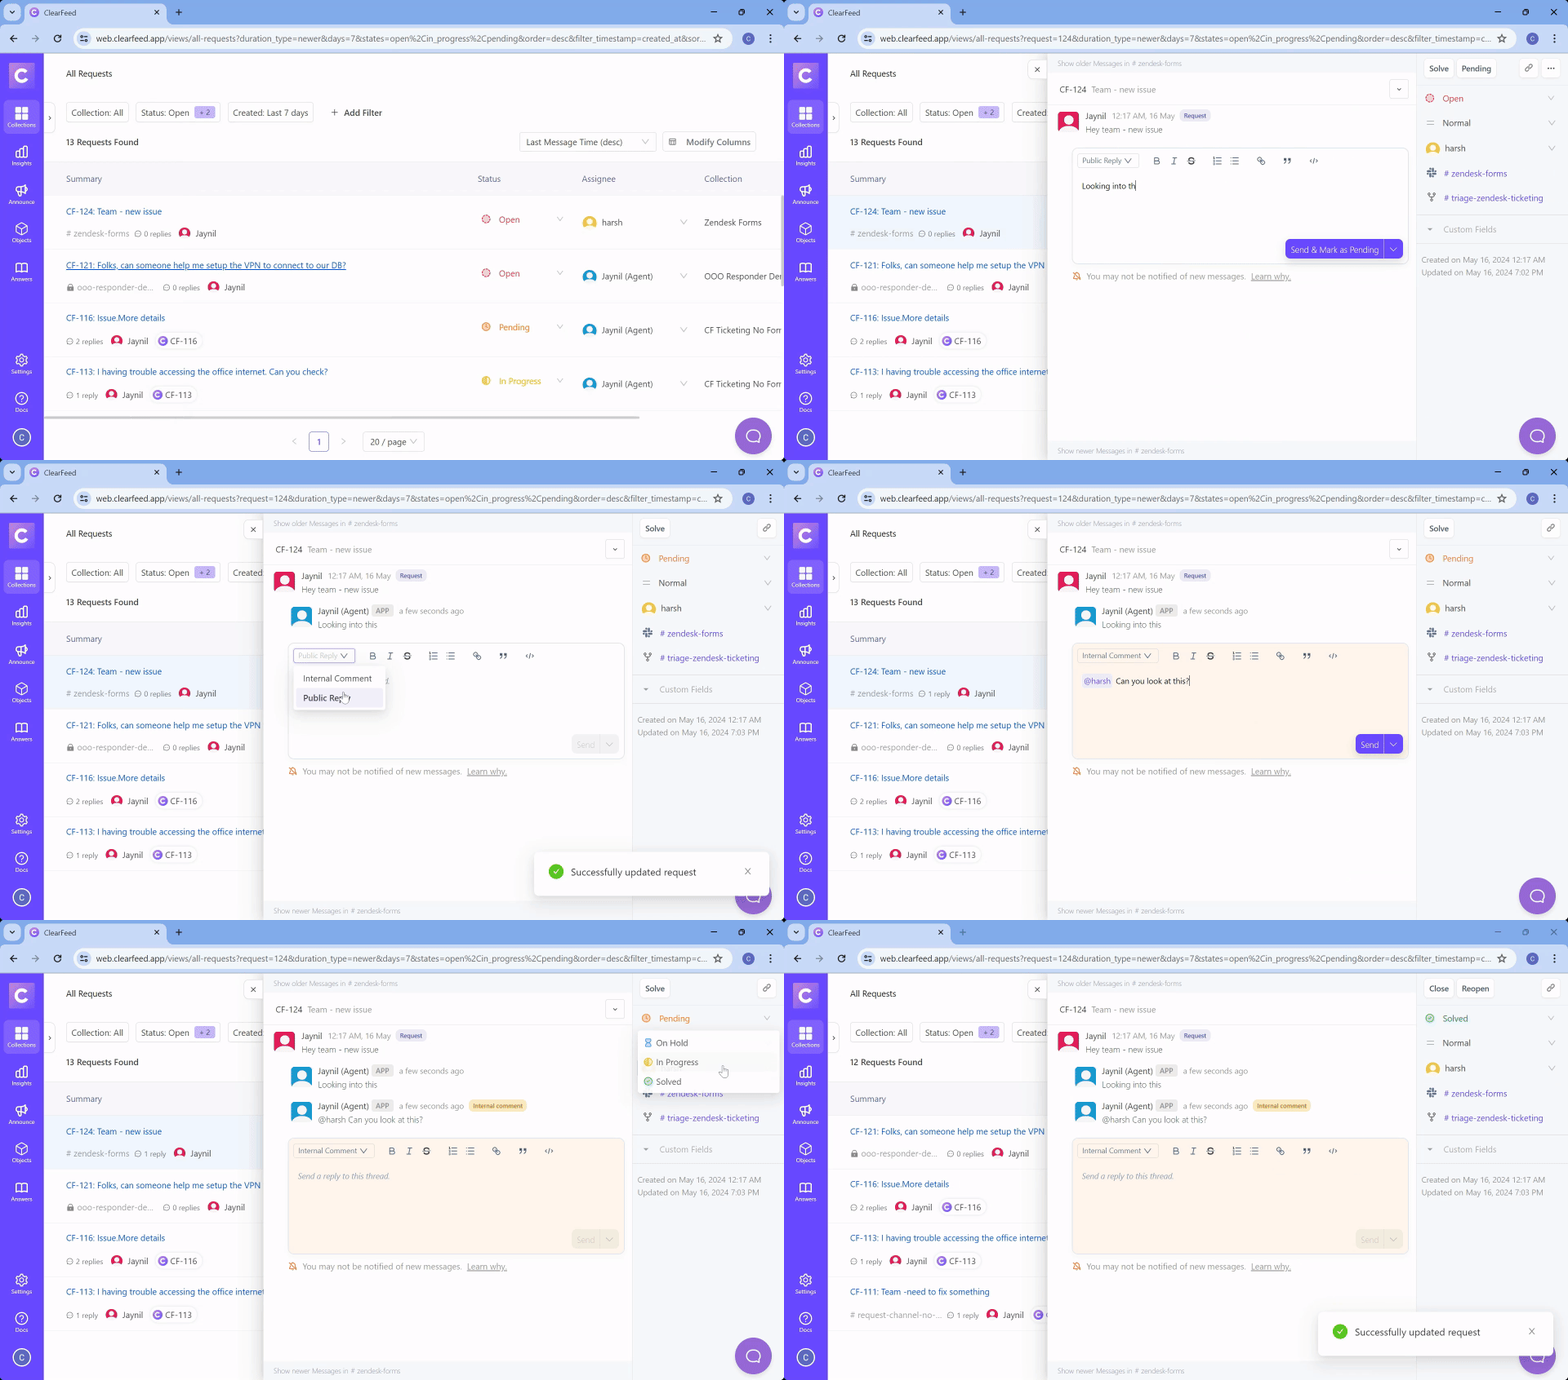
Clicking a request opens the details drawer on the right-hand side. This is where most agent actions take place.
What You See
Requester & Channel Info: Who raised the request and where.
Conversation History: Full message thread across Slack, email, or other integrations along with Virtual agent/Agent Assistant responses.
Metadata: Request type, priority, SLA, linked ticket info etc.
Actions
Modify request properties including assignee, contributors, priority, and status.
Edit the request title by clicking on it
Classify interactions as Not a Request to exclude them from tracking and reporting.
'Not a Request' option is only available for Slack-originated requests, not for email or web chat tickets.
Manage Contributors from the request/ticket details drawer:
Contributors are displayed as a group of avatars in the details drawer
When there are many contributors, a "more" indicator appears with the remaining count
Click the Contributors section to add, update, or remove contributors
Multiple users can be selected as contributors for a single request/ticket
Responding to Requests
Respond to customers with public replies and continue the conversation.
Use Summarize above the reply editor to generate an AI summary of the request thread. The summary appears progressively in a separate Thread summary panel, can be copied, and does not change your draft reply. (available only when AI is enabled)
Use Generate reply from the Assist menu to draft a response with an AI Agent. The draft is inserted into the editor for review, edits, and sending. (available only when AI is enabled)
Tag Slack users on replies by adding @ and typing out their Slack handles. These users will be notified on Slack if tagged in replies.
The reply editor supports multi-line code blocks that preserve formatting when syncing to Slack.
Share private comments visible only to your team (similar to using the 🔓 emoji in triage channels). If a triage channel is not configured, these private comments are shown only in the Web App.
Send attachments in public or private replies using either:
Clip Icon Method: Click the clip icon in the thread to attach files
Slash Command Method: Type "/" in the Reply Editor, then select "Attachments" from the popup menu using arrow keys or mouse click
Delete replies and comments by hovering over the comment and clicking on the three dots to view the Delete option.
Edit replies and comments by hovering over the comment and clicking on the three dots to view the Edit option. Only web-app messages you authored can be edited.
React to messages with emojis by clicking the emoji reaction icon on any message to add emoji reactions.
By default, replies from the WebApp are posted to Slack as the ClearFeed bot (with username and avatar of the person replying). Refer to this guide for more details and post as Yourself.
Emoji reactions: Reactions added from the WebApp are currently posted by the ClearFeed app (not the individual agent) due to Slack API scope limitations. This means the reaction appears as coming from the ClearFeed bot rather than the agent who added it.
Generate replies with AI
Generate reply helps agents start from a complete, context-aware draft instead of a blank reply box. It uses the request conversation and your configured AI Agent/knowledge base to create the draft.
To generate a reply:
Open a request or ticket in the WebApp.
In the reply editor, click Assist or type
/and select Generate reply.Select the AI Agent you want to use. ClearFeed defaults to the agent configured for the Collection when one is available.
Review the draft in the editor, make any edits you need, and send it when ready.
You can refine a generated draft before sending it:
Type an instruction such as
make it more conciseoradd a link to our pricing page.Use tone shortcuts such as Friendlier, Formal, Shorten, or Polish.
Undo or Redo draft changes while you are editing.
Generate reply is available on Professional and above plans or with the AI Pack add-on. If no AI Agent is configured for the Collection, ClearFeed shows a link to configure one.
Rewrite with AI
Rewrite with AI helps you polish your draft replies before sending them. Use this feature to improve clarity, tone, and structure of your responses.
To rewrite a reply:
Open a request or ticket in the WebApp.
Start drafting your reply in the reply editor.
Click the Assist menu (lightning bolt icon ⚡) or type
/in the editor.Select Rewrite with AI from the menu.
ClearFeed will rewrite your draft to improve clarity, tone, and structure.
Review the rewritten draft, make any additional edits if needed, and send it when ready.
Access Activity Logs to track key actions such as:
CSAT submissions
Blocker status changes
Request classification updates
Status changes in the Request
Assignment Changes in the Request
Handling Emails from WebApp
Delete Email for Email Tickets
The Delete Email action is available for email-originated tickets. When you use this option, the ticket is deleted from ClearFeed and will not reopen, even if there are follow-up replies to the original email thread. This is similar to the Not a Request option used for Slack requests. The Delete Email option is not shown for Tickets that are already marked Solved.
Important: Deleting an email ticket in ClearFeed does not delete the original email from Gmail or your email provider; it only removes the ticket from ClearFeed.
Use
Delete Emailprimarily for spam or irrelevant emails. For other cases where you may want the ticket to reopen on future replies, use the regular ticket states (e.g., mark as solved) instead.If there are existing responses from your team on the email ticket, the Delete Email button collapses the thread on triage and doesn't sync any future replies.
Post Replies in Slack as Yourself
By default, replies from the WebApp are posted to Slack as the ClearFeed bot (with username and avatar of the person replying). From Slack’s perspective, these messages come from the bot, not the actual user and as a result, the user who replied is not notified when new messages are addd to the Slack thread.
To improve this experience, ClearFeed provides you with an option to post on your behalf using Slack OAuth connection, ensuring you receive notifications and the conversation flows naturally.
Setup
If you have not authorized yourself, everytime you reply to a Slack-linked request from the web app, ClearFeed gives you an option to connect via Slack and reply using your Slack identity to get notified about replies. Make sure you complete this Slack authorization using the same email/Slack user that you use in your Slack workspace. If the email used to log into the ClearFeed WebApp does not match the email of your Slack workspace user, the Slack OAuth step can fail with an error.

Click on "Connect Slack" and you will be redirected to Slack authorization page. Click "Allow"

Your Slack account is now linked.
Using the Feature
If you have connected to Slack and authorized ClearFeed, you will be prompted to select a target channel when replying (if both options are available):
Request Channel – Displayed only if the request has an associated request channel.
Triage Channel – Displayed only if a triage channel is configured for your collection.
ClearFeed remembers your last selection for future replies.
Channel Membership Behavior
If you are not a member of the selected channel:
Public channel – Your reply will be posted, but you will not receive notifications unless you join the channel.
Private channel – ClearFeed (via the bot) will first invite you to the channel and then post the reply on your behalf.
Attachments
If a user (authenticated with a user token) sends a reply from the web app that includes attachments, the posting behavior depends on how many channel options were shown and which channel was selected.
When Two Channel Options Are Shown
Selected Slack Channel
The text message is posted as the user.
Attachments are also posted as the user.
Channel Not Selected
The text message is synced as a whitelisted user.
The attachment is posted by the bot with the note: “Uploaded by <User>”.
When Only One Channel Option Is Shown
The text message is posted as the user.
Attachments are also posted as the user.
FAQs
What are the limitations on attachments when uploading through the ClearFeed web app? Answer:
Number of Attachments: You can upload up to 10 attachments in a single message.
Maximum File Size: Each file can be up to 100MB in size.
Unsupported File Types: Certain file types are not supported. You can find a list of restricted file types in this article.
How are messages with attachments handled in the ClearFeed web app? Answer: When you send a message with attachments, two separate messages will be sent:
The first message contains the actual text or content of your message.
The second message includes the attachments.
Can I preview PDF attachments in the web app? Answer: Yes, PDF attachments can now be previewed directly in the web UI instead of downloading them.
Does the web dashboard have a Dark Mode? How can we enable Dark Mode on the ClearFeed web app? Answer: Yes, ClearFeed's Web Dashboard has a dark mode. You can toggle it by hovering your profile icon at the bottom left of the screen.

Last updated