> For the complete documentation index, see [llms.txt](https://docs.clearfeed.ai/clearfeed-help-center/llms.txt). Markdown versions of documentation pages are available by appending `.md` to page URLs; this page is available as [Markdown](https://docs.clearfeed.ai/clearfeed-help-center/getting-started/getting-started-guides/for-internal-support/using-an-external-ticketing-system.md).
# Supporting Employees using an External Ticketing System
Manage internal support requests in Slack using an external ticketing system with ClearFeed's bi-directional Slack integration
This guide helps you set up ClearFeed to sync internal employee requests from Slack with your external ticketing system (Zendesk, Jira, Freshdesk, etc.), keeping everything synchronized across both platforms.
## Sign Up & Connect
1. Go to [ClearFeed Web App](https://web.clearfeed.app/)
2. Sign up with **Google, Microsoft, or Email** (use your Slack workspace email)
3. During onboarding, select:
* **Primary use case:** `Supporting Employees`
* **How to use ClearFeed:** `Create Tickets in External System`
4. **Authorize ClearFeed** when prompted to connect to your Slack workspace
5. **Connect Your Ticketing System** (optional - can be done later)
You can connect to your external ticketing system during signup or skip this step and do it later. ClearFeed supports: Zendesk, Jira Service Management, Salesforce, Linear, Freshdesk, HubSpot, ClickUp, Intercom, and more.
## Understanding Your Setup
After signing up, ClearFeed automatically configures two ways for employees to create support tickets that sync with your external ticketing system:
* **`#cf-request-channel`** - Slack channel where employees post questions and issues
* **ClearFeed App** - Slack app home where employees can file tickets directly without using a channel
* **Triage Channel** - Not created automatically, but you can [set one up manually](/clearfeed-help-center/clearfeed-helpdesk/triage-channel-setup.md) if you want a centralized channel to manage all tickets
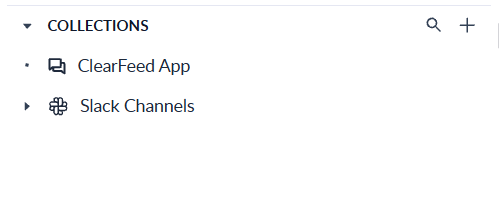
Integrations Edition - Collections and Ticket Sources
{% hint style="info" %}
**Note:** ClearFeed automatically posts educational messages in `#cf-request-channel` during setup. These messages explain how to create and manage tickets in your external ticketing system using ClearFeed.
{% endhint %}
### Request Channel (`#cf-request-channel`)
Your **request channel** is where employees post questions and issues publicly. When a message is posted:
* ClearFeed starts tracking this as a request
* Depending on your configuration, it automatically creates a ticket in your external ticketing system or waits for manual triggering
* The ticket syncs bi-directionally between Slack and your ticketing platform
* Employees see ticket details posted on the thread
* If configured, the AI Agent can find suggested answers and show them to the employee before or after the ticket is created
### ClearFeed App (Slack Home Tab)
Employees can also file tickets privately without posting to a channel:
* Open the **ClearFeed** app in Slack and go to the **Home** tab
* Click **File a Ticket** and fill in the ticket details
* The ticket is created directly in your external ticketing system and is immediately visible in your ticketing platform
* Useful for employees who want to file tickets privately or bypass the request channel
{% hint style="info" %}
**Note:** Unlike Internal Helpdesk, there is **no triage channel** in this setup. Only messages that are converted to tickets are tracked in your ticketing system. Work directly in `#cf-request-channel`, via the ClearFeed App, or in your external ticketing system to manage tickets.
{% endhint %}
## Understanding Collections
Ticket sources are organized as **Collections** in ClearFeed. When you sign up, ClearFeed creates two collections by default:
* **Slack Channels** - Contains the `#cf-request-channel` where employees post publicly
* **ClearFeed App** - Handles tickets filed privately from the ClearFeed Slack app's Home tab
Both collections are connected to your external ticketing system for automatic sync. Collections are how you organize and manage your internal support sources in ClearFeed. Each collection can have its own settings, ticketing configuration, and responders.
### Adding More Slack Channels
As your support needs grow, you can add more Slack channels to the **Slack Channels** collection:
* **Public channels** can be added from the ClearFeed WebApp: go to [Collections](https://web.clearfeed.app/collections), click on **Slack Channels**, and add a new channel
* **Private channels** can be added by typing `/invite @Clearfeed` in the channel itself
* You can also create **additional collections** to group channels for different teams (e.g., IT, HR, Legal) with their own workflows, responders, and ticketing settings
## Integrating with External Ticketing System
**If you connected your ticketing system during initial account setup, you can skip this section**. Otherwise, follow these steps:
1. Go to **Settings > Integrations** from the left navigation in the ClearFeed app
2. Connect to your desired ticketing system (Zendesk, Intercom, Freshdesk, etc.)
3. Go to the **Inbox** and click on the **Slack Channels** collection
4. Click **Settings** in the top right corner
5. Expand the **Ticketing** section
6. Enable **Ticketing** and set the ticketing type to your integrated system
7. Choose your trigger mode: **Manual** (emoji-based 🎫) or **Automatic** (every message creates a ticket)
For detailed integration guides, refer to:
* [Zendesk](/clearfeed-help-center/integrations/zendesk.md)
* [Intercom](/clearfeed-help-center/integrations/intercom.md)
* [Salesforce](/clearfeed-help-center/integrations/salesforce.md)
* [HubSpot](/clearfeed-help-center/integrations/hubspot.md)
* [ClickUp](/clearfeed-help-center/integrations/clickup.md)
* [Linear](/clearfeed-help-center/integrations/linear.md)
* [Freshdesk](/clearfeed-help-center/integrations/freshdesk.md)
## Creating Tickets
Employees can file tickets in two ways: publicly in request channels or privately via the ClearFeed App.
### From the Request Channel
**Manual Ticketing (Emoji-Based):**
1. Post a message in `#cf-request-channel` (e.g., "I need a new laptop")
2. Add the 🎫 emoji to trigger ticket creation
3. ClearFeed creates a ticket in your external ticketing system
4. A ticket message with the ID and link to the ticket will be posted as a reply on the Slack thread
**Automatic Ticketing:**
1. Post a message in `#cf-request-channel`
2. ClearFeed automatically creates a ticket in your external ticketing system immediately
3. A ticket message with the ID and link to the ticket will be posted as a reply on the Slack thread
### Privately via ClearFeed App
Employees can file tickets without posting to a channel:
1. Open the ClearFeed app's Home tab in Slack and click **File a Ticket**
2. Fill in the ticket details in the form
3. The ticket is created directly in your external ticketing system
4. Only your support team and the ticket requester see this ticket (not visible in the request channel)
## Reply to and Manage Tickets
### From the Slack Request Channel
* Replying to the thread in `#cf-request-channel` → syncs to your external ticketing system
* Update status, priority, or assignment in your ticketing system → reflects in Slack thread
### From Your External Ticketing System
* Find the ticket in your external ticketing platform using the Ticket ID shown by ClearFeed
* Reply from the ticketing system - the reply appears in the linked Slack thread
* Replies from Slack also show up in the ticket in your external system
* Depending on your specific ticketing system, internal comments may sync between Slack and your ticketing platform
### From the ClearFeed WebApp
* You can see all requests and tickets from the ClearFeed WebApp
* Click on a specific request and post replies from there - these are also synced to the Slack thread and your external ticketing system
## FAQs
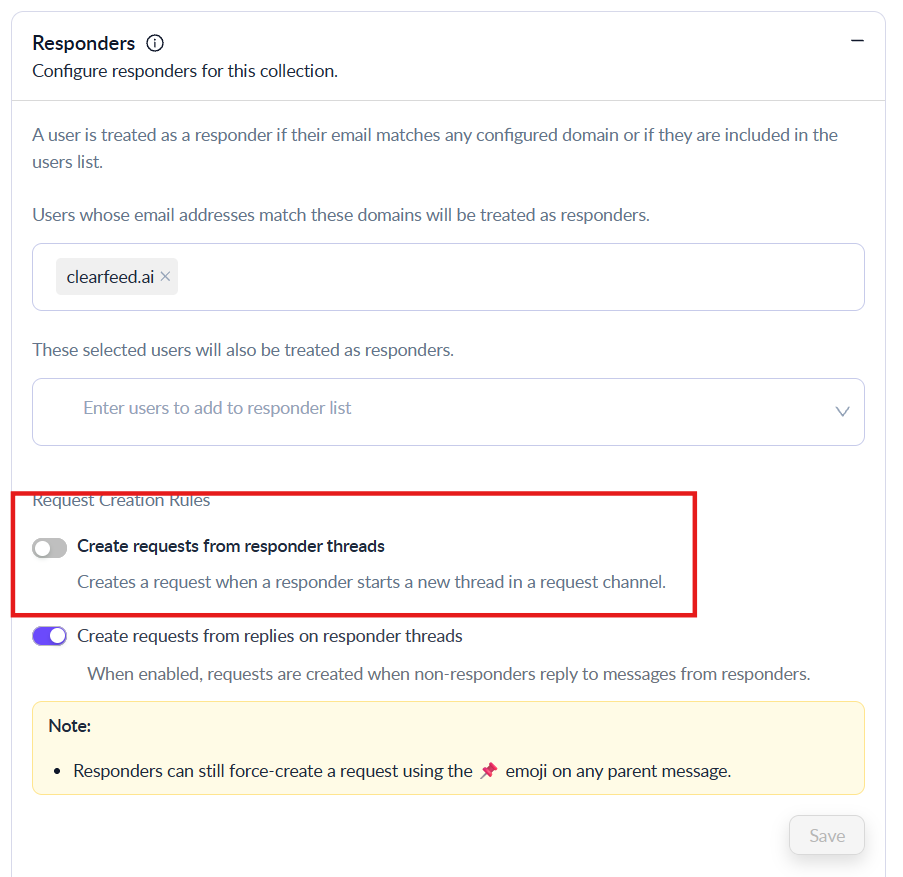
1. **How do I stop creating tickets from my team's messages?**\
When a new ClearFeed account is set up, it creates tickets from all users. You can turn off ticket creation from your own team in the "Responders" section of the Collection Settings:
* Click on the **Slack Channels** collection from the Inbox
* Click **Settings** in the top right corner
* Expand the **Responders** section
* Turn off "Create requests from responder threads"
Turn off ticket creation from responders
2. **How do I change between manual and automatic ticketing?**\
This can be done from the Collection Settings:
* Click on the **Slack Channels** collection from the Inbox
* Go to **Settings > Ticketing** from the top right
* Toggle between manual and automatic ticket creation
* Configure the emoji to be used as a trigger for manual ticket creation
## AI Agents
ClearFeed comes with an AI Agent pre-configured to answer questions from the World Wide Web by default. The AI Agent is triggered whenever a new employee request is detected. When it finds relevant answers, it can show suggested answers to the employee before or after the ticket is created in your external system.
### Customize or Disable
**To add your own knowledge sources:**
1. Go to **Settings > AI > Knowledge Sources**
2. Connect your documentation (Confluence, Notion, Google Drive, etc.) and tag them
3. Go to **Settings > AI > Agent Studio** and click on the `Default Agent` pre-configured in your account
4. Add the Knowledge Sources added in Step 2 using their tags
5. Optionally - disable the Web Search option (to prevent answers beyond your knowledge sources)
**To change visibility of AI Agent Answers:**
1. Go to the **Inbox**
2. Click on the Collection where you want to enable/disable the AI Agent (e.g., **Slack Channels**)
3. Click on **Settings** from the top right and then click on **AI Agent** section
4. You can disable the AI Agent completely - or switch to **Virtual Agent** mode to provide automated replies to employees when they create tickets
## Next Steps
* [Whitelabeling the ClearFeed bot](/clearfeed-help-center/account-setup/whitelabel-clearfeed.md) to match your brand
* [Set up Out of Office responses](/clearfeed-help-center/clearfeed-helpdesk/workflows.md) - Automatic responses when your team is unavailable
* [Configure Forms & Custom Fields](/clearfeed-help-center/clearfeed-helpdesk/forms.md) - Collect structured information from employees
* [Build Automations](/clearfeed-help-center/clearfeed-helpdesk/automations.md) - Auto-respond, escalate, and organize tickets based on rules
* Import forms from your ticketing system:
* [Zendesk Forms](/clearfeed-help-center/integrations/zendesk/forms.md)
* [Freshdesk Forms](/clearfeed-help-center/integrations/freshdesk/forms.md)
* [HubSpot Forms](/clearfeed-help-center/integrations/hubspot/forms.md)
* [ClickUp Lists](/clearfeed-help-center/integrations/clickup/forms.md)
* [Intercom Forms](/clearfeed-help-center/integrations/intercom/forms.md)
Need help? [Contact our team](https://clearfeed.ai/contact) for personalized onboarding.